Flat roofs are usually found on commercial buildings and older homes, and they are prone to leaking. That’s because the level surface of flat roofs doesn’t allow rain, snow, and water to drain off of the roofing surface, and settling, pooling, holes, cracking, punctures, and other damage can allow water to drip, drain, and even pour into the building.
Most flat roofs are covered with a membrane made of rubber or synthetic material, but some are PVC membranes or even asphalt shingles. The type of roofing material will make a different in the repair, so you should have an idea of what your roof is covered with.
Flat roof replacement is expensive, and repairs—even those performed by a professional—are much more affordable than replacement. So it’s important to maintain your commercial roof and repair small leaks before they become major problems.
Your priority when faced with a roof leak is to stop the water. If it’s still raining or there’s snow on the roof that’s melting, you may need to cover the leaking area with a tarp, create a dam around the leaking area and cover it, or soak up and remove water from the area of the leak until it’s dry enough to repair. If you allow water to continue to enter the damaged area, it can cause water damage, mold and mildew growth, and even electrical or structural problems.
Once you’ve stopped the active leak, follow the steps below to temporarily patch the spot. Even if you’re able to patch it and stop the current leak, it’s a smart idea to call a roofer that specializes in flat roofing.Have them assess the damaged area and the rest of the roof for potential problems and schedule a roof repair if needed. Since flat roofs are notorious for leaking and being hard to permanently patch, you may need a professional to do the job in a way that won’t keep springing leaks.
Step 1: Find the Leak
Flat roofs tend to lean and drip straight down. This can make it easier to find the source of the leak, since in many cases, all you’ll have to do is look straight up from where water is dripping or pooling on the floor. Mark the spot by measuring the distance to two walls, a skylight, or other feature you can easily find on the outside of the building, or have someone spot the leak and walk you to the area once you’re on the roof. If the water is running down the wall or appearing to come from different places, you may need to trace the path until you find the access point.
Step 2: Access the Roof
If you can safely do so, access the roof and use the measurements or spot guides to locate the leaking area on the roof. If a branch or other debris has caused damage, it may be easy to spot. If you can’t see anything that’s obviously causing the problem, carefully look over the roof surface for holes, cracking/alligatoring, sagging areas, or other physical damage, or check roofing seams, flashing, vents, or other access points that are near the source of the leak.
For insurance purposes, you should take a photo of the damage and the cause of it, if possible. This is especially important if the leak is being caused by storm damage, fallen tree branches, or suspected vandalism or thrown objects. Photos can be used by insurance companies to figure insurance payouts for covered events or damage.
Step 3: Clear the Damaged Area
Remove any objects or debris near the leak. If the damage was caused by falling branches or other sharp objects, be sure to carefully pick up and dispose of the items. You can cause more leaks by pulling, dragging, or setting down the objects on other areas of the roof. It’s safest to have someone on the ground block off an area where you can drop the object off of the roof. Take care not to hit the building, people, vehicles, or other items as you drop the debris.
If there is standing or pooled water, use a squeegee or towels to remove it. You may need to create a barrier or dam around the area of the leak if the roof membrane or other material is sagging or water keeps flowing to the area. Make sure to leave a wide space around the leak to give yourself room to work.Be careful as you work around the area of the leak. Moving water can also push the roofing membrane, tearing it and creating a bigger leak, or it can displace shingles or other materials.
Step 4: Survey the Damage
Punctures or damage created by branches or debris are usually easier to spot and identify, as are sunken or indented areas and spots on membrane roofs that are cracking (also known as alligatoring). Tiny holes, leaks at seams, or water flowing in under flashing or at the point of access for vents or other areas may be harder to find. If you can’t locate the area where water is leaking in, you may need to call a professional. Additionally, large areas of damage, cracking in a large area or over the entire roof, blistering, or large-scale sagging are all issues that are best left to flat roofing experts.
Step 5: Remove the Damaged Membrane or Roofing Material
If there is a small area of damage, like a missing or cracked shingle, a blistered area, or an obvious puncture or leak, you’ll want to start by removing cracked shingles or cutting through that area of the membrane and removing the damaged material. For membrane roofs, this includes the layers under the top membrane but not the roofing felt between the roof and the ceiling.
Step 6: Completely Dry the Area Around the Leak
Once you’ve removed the damaged material or membrane and any damaged layers below, ensure that the entire area is completely dry. No repairs can take place until the surface and layers of the roof are completely dry. Patching materials won’t adhere to the flat roof membrane if the surface is damp, and wet or damp inner layers can cause mold or mildew to grow. You’ll have to wait for the rain to stop or the snow to melt and for the surface and inner layers to dry. Use a heater or forced air on low heat to dry the area if needed. If a lot of water leaked through or you’re unable to get the entire area completely dry, you may need to call a professional.
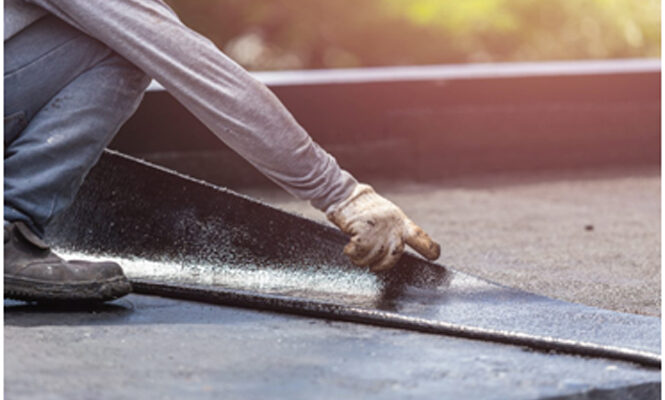
Step 7: Patch the Hole
You’ll need the following materials in order to patch the leak:
- Roofing cement
- An piece of roofing membrane that will fully cover the leak plus several inches of overhang on every side (for membrane roofs) or extra shingles that will cover the damaged area
- A putty knife, scraper, or other flat applicator
- A second putty knife or flat object for use as a scraper
- Roofing nails
- A hammer
Use the putty knife or flat applicator to apply roofing cement to the area of the leak, being sure to completely cover the leak and the area around it and the entire exposed section under the roofing membrane you cut away or damaged shingles. Apply a generous amount of roofing cement in a wide swath around the area (for membrane repairs) or under the missing or damaged shingle (for shingle roofs). Then place the extra piece of roofing membrane or shingle on top of the entire area, pressing down firmly so that the new membrane adheres to the roofing cement. For membrane roofs, smooth away any bumps or air pockets, scraping gently from the center out in all directions. Be sure not to use sharp, jagged, or pointy objects to prevent making new holes or tears in the new or existing membrane. Then use the roofing nails to nail down the flaps of the membrane or the new shingle. Cover the nails generously with more roofing cement to make them watertight. Allow the entire area to dry.
Watch the repaired area during the next heavy rain or weather event to make sure the leak has been fixed. If more water leaks in, repeat the repair or call a professional.
Step 8: Call a Flat Roof Repair Contractor
DIY flat roof repairs are only a temporary fix in most cases. While some small leaks and punctures may be permanently fixed, recurring leaks or larger areas of damage will require professional attention. That’s especially true for flat roofs with sagging areas, multiple leaks, cracking, alligatoring, and large areas of damage. The Prime Buyer’s Report Top Ten list for roofers in your area may have quality contractors you can call for permanent flat roof repair services.
Leave a Reply