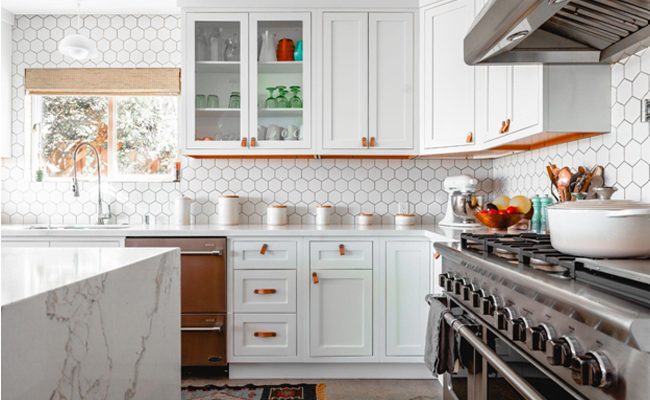
Are you feeling like your home could use a little refresh? A new coat of paint can do wonders! In this blog post, we will talk about seven professional painter tips to help you repaint your cabinets and refresh the look of your home.
Painting your cabinets can be a daunting task, but with these tips, you’ll be able to get the job done like a pro!
1. Choose The Right Paint For Your Cabinets
There are a few things to consider when choosing paint for your cabinets. The type of paint you use will depend on the material of your cabinets. If you have wooden cabinets, you’ll want to use oil-based paint.
For laminate or melamine cabinets, you’ll want to use latex paint since this type of paint will adhere to the surface better than other kinds of cabinet paint for a clean and lasting look.
Tip: When painting kitchen cabinets, it’s best to use a semi-gloss or high-gloss finish.
This will help protect your cabinets from grease and moisture. In addition, higher sheen paint is easier to clean so you will be able to remove finger prints and dirt easily when needed.
2. Tape Off All The Areas You Don’t Want To Get Paint On
This may seem like an obvious step, but it’s important to take the time to properly tape off all the areas you don’t want the paint to get on. This will help you avoid any accidental brush strokes or drips which can destroy the overall look of the project if not prevented.
Tip: Use painter’s tape to create sharp lines and edges when taping off your cabinets. You can apply the tape around areas that you plan to paint a different color, or just apply painter’s tape to help keep lines straight and crisp.
3. Sand Down The Cabinets To Create A Smooth Surface
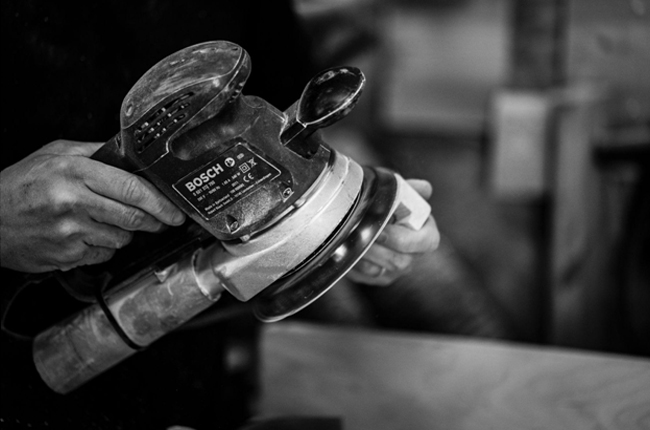
Once you have taped off all the areas, you’ll want to sand down the cabinets to create a smooth surface if your wood cabinets show wear and tear.
This will help the paint adhere better and give you a more professional-looking finish because you won’t have to worry about rough wood disrupting the overall look of the project.
Tip: Use fine-grit sandpaper to avoid damaging the wood on your cabinets. If you’re painting over laminate or melamine cabinets, you don’t need to worry about sanding them before painting. I like to use a sander to reduce the amount of physical labor needed on this step, and an electric sander will help you be more consistent as you sand the cabinets.
4. Prime The Cabinets With An Appropriate Primer
After you have sanded the cabinets, you’ll want to apply a primer to the areas that you sanded. This will help the paint stick to the surface and give you a more even-looking finish.
When priming your cabinets, be sure to use an appropriate primer for the type of paint you are using. For example, if you’re using latex paint, use a latex-based primer.
Tip: If your cabinets are dark or stained, you may need to use a white primer to help cover up any blemishes before painting them. Be sure to let the primer dry completely before moving on to painting the cabinets!
5. Paint The Cabinets In Two Coats Of Paint, Allowing Each Coat To Dry Completely
Now it’s time to start painting the cabinets. Start with a thin layer of paint, and then allow it to dry completely before adding another coat. This will help you achieve an even finish without any brush strokes or drips.
Tip: Use a small paintbrush to get into all the nooks and crannies of your cabinets. A foam roller can also be used for larger surfaces to reduce brush strokes from appearing in the final product. Foam rollers will help your cabinets look great and give you a bright finish that you can be proud of!
Allow each coat of paint to dry completely before moving on to the next one. Depending on the type of paint you’re using, this could take anywhere from two to four hours.
Once you have finished painting the cabinets, remove the painter’s tape carefully so you don’t accidentally pull off any wet paint!
6. Add Hardware Or New Knobs To Give Your Cabinets A Fresh Look
Updating the hardware on your cabinets is a quick and easy way to give them a fresh new look. You can either use the same size and style of hardware or go for something completely different to change up the look of your cabinets.
Tip: If you’re painting over existing hardware, make sure to remove it before painting and then reattach it once the paint has dried. This will help you avoid any accidental paint chips or scratches on the surface of your cabinets.
7. Apply A Sealant Or Topcoat
After you have painted the cabinets and allowed them to dry completely, you’ll want to apply a sealant or topcoat. This will help protect the paint job and make it last longer. This step is especially important if your cabinets get a lot of use like in a kitchen or mudroom.
Tip: Be sure to let the sealant or topcoat dry completely before using the cabinets. This could take anywhere from two to four hours depending on the product you’re using.
Refresh Your Home By Repainting Your Cabinets Today!
Now that you know how to repaint your cabinets like a pro, put these tips into action and refresh the look of your home today! Thanks for reading! I hope this has helped.
Check out more interior design tips and tricks to make sure your home looks great throughout the year!
Author Bio:
Hi, I’m Chris. I’m a professional painter with over 10 years of experience. I post articles on Home Painting Expert to show homeowners tips, guides, and advice to save them time and money when painting their own homes.
Leave a Reply